
The oil cleansing method removes makeup, sunscreen, and daily grime effectively, and it tends to work best for dry or sensitive skin when done with the right technique. If you wear makeup or sunscreen daily, try one careful cleanse tonight.
- Patch test on your inner arm first and wait to check for any reaction before applying broadly.
- Skip this method if you have active cystic acne or seborrheic dermatitis until you've talked to a dermatologist.
- Give it 2 to 4 weeks before judging the results.
Key Takeaways
Oil cleansing works by dissolving nonpolar sebum and makeup with nonpolar oil, and it benefits dry and sensitive skin most reliably when paired with proper technique and a 2 to 4 week trial period.
| Point | Details |
|---|---|
| Patch test first | Apply new oil to your inner arm and wait 24 hours before using it on your face. |
| Match oil to skin type | Choose linoleic-rich oils like sunflower or safflower for dry and sensitive skin. |
| Emulsify before rinsing | Add lukewarm water and massage until the oil turns milky for a clean rinse. |
| Watch for red flags | Stop and see a dermatologist if you notice worsening redness or deep breakouts. |
| Try a formulated option | Yuka+Face's Vitamin C Cleansing Oil offers a cold-pressed, fragrance-free alternative to DIY blends. |
Table of Contents
- What Is the Oil Cleansing Method?
- Does Oil Cleansing Actually Improve Your Skin?
- How Do You Oil Cleanse Correctly?
- Which Oils Work Best for Cleansing?
- Who Should Try Oil Cleansing (and Who Should Skip It)?
- Purging or Reacting? How to Troubleshoot Oil Cleansing
- How Yuka+Face Approaches Oil Cleansing
- Sources
- FAQ
What Is the Oil Cleansing Method?
The oil cleansing method, often shortened to OCM, uses oil instead of a foaming or gel cleanser to lift dirt, sebum, and product residue off your skin. It comes in three common formats: DIY oil blends mixed at home, formulated cleansing oils sold as finished products, and cleansing oils that include a small amount of surfactant to help them rinse cleanly.
The chemistry is simple. Sebum, the oily substance your skin produces naturally, is nonpolar. Water is polar. Nonpolar substances dissolve other nonpolar substances, which is why water alone struggles to lift oil-based grime but a cleansing oil breaks it down on contact. This is also why waterproof sunscreen and long-wear makeup, both formulated to resist water, come off far more easily with an oil-based cleanser.
One clinical review found that oil cleansers remove makeup and sunscreen more thoroughly than water-based washing alone, while leaving more of the skin's protective lipid layer intact than some foaming cleansers do.
OCM isn't a new trend. It's a foundational step in Korean double cleansing routines, where an oil cleanser runs first to dissolve makeup and sebum, followed by a water-based cleanser to clear away anything left behind. That sequence, oil first, then water, is the backbone of most modern OCM routines, whether you're using a $12 drugstore oil or a boutique blend.
- DIY blends: cheapest, most customizable, highest risk of a poorly balanced formula.
- Formulated cleansing oils: consistent texture, often include stabilizers and antioxidants.
- Hybrid oil-to-milk cleansers: contain surfactants, rinse more easily, slightly less "pure" to the OCM concept.
Does Oil Cleansing Actually Improve Your Skin?
The strongest evidence supports oil cleansing for dry and sensitive skin, not for treating active acne. That distinction matters more than most product marketing lets on.

For dry or barrier-compromised skin, oil cleansing can improve hydration and reduce the tightness that comes after washing with harsher surfactants. Because oil dissolves oil rather than stripping it with detergents, it tends to leave more of your skin's natural lipids in place. That matters for anyone managing eczema-prone skin, cold-weather dryness, or the kind of dehydration that comes from over-washing.
Acne is where the evidence gets murkier. Reviews note there's less clinical support for oil cleansing as an acne treatment than there is for its use in dry or sensitive skin, and long-term outcomes for acne-prone users haven't been well studied. Some people with oily or acne-prone skin do fine with the right oil; others find it clogs their pores further. There's no clean consensus.
Dermatologists interviewed on the subject tend to agree on one philosophy above all else:
The goal of cleansing isn't a "squeaky clean" feeling. That tightness is a sign your barrier has been stripped, not a sign your skin is actually clean. Comfortable, hydrated skin after washing is the real marker of a good cleanse.
That reframing, drawn from dermatologist guidance on oil cleansers, is worth sitting with if you've spent years associating a tight, dry face with "clean." Dermatologists also caution against automatically double cleansing. It's useful for heavy makeup days, but if you're not wearing much product, a single oil cleanse can be enough, and adding a second wash out of habit can sometimes cause more irritation than it prevents.
How Do You Oil Cleanse Correctly?
Here's the full routine, start to finish.
- Wash your hands first. You're about to touch your face for up to 90 seconds, so start clean.
- Remove heavy eye makeup separately if needed. Waterproof mascara sometimes needs a dedicated remover before OCM, though most oils will dissolve it on their own with a bit of extra time.
- Dispense oil onto completely dry skin. Dry hands, dry face. Water at this stage will make the oil bead up instead of spreading. Use roughly a dime-sized amount for dry skin, a nickel-sized amount for normal skin, and slightly less, closer to a dime, for oily skin, since a heavier layer can feel greasy without added benefit.
- Massage in gentle circles for 30 to 90 seconds. This isn't a scrub. Let the oil do the work while your fingertips glide. This step is where sunscreen and makeup actually break down.
- Emulsify with lukewarm water. Splash a small amount onto your face and keep massaging. The oil will turn milky and cloudy, that's the emulsification working, breaking the oil into water-soluble droplets you can rinse away cleanly.
- Remove with a warm, damp microfiber cloth. Steam the cloth under warm (not hot) water, press it against your face for a few seconds to soften residue, then wipe gently. Repeat with a fresh warm pass until the cloth comes away clean.
- Rinse with plain water until no residue remains. Run your fingertips over your skin. Any lingering slickness means you need another rinse pass.
- Decide on a second cleanse. Skip it most nights. Add a brief second cleanse with a gentle water-based wash on heavy makeup days or if your skin runs oily.
Pro Tip: Warm, steamed cloths emulsify oil more thoroughly than a splash of hot water, and they're gentler on your skin barrier than scrubbing with hot water alone, which can strip more than it should.
Run this routine for 2 to 4 weeks before deciding whether it's working. Patch testing any new oil on your inner arm first, and watching for redness or bumps over 24 hours, catches most reactions before they reach your face.
Which Oils Work Best for Cleansing?
The single most useful thing to understand before choosing an oil is the difference between linoleic acid and oleic acid, two fatty acids that behave very differently on your skin.
Oils high in linoleic acid, like sunflower and safflower, tend to support barrier repair and sit lighter on the skin. Oils high in oleic acid, including some formulations of olive and coconut oil, are heavier and can be less suitable for a compromised or acne-prone barrier. Neither fatty acid is "bad," but matching the profile to your skin type changes the results considerably.
A few additional rules matter as much as the fatty acid profile:
- Choose cold-pressed oils when possible. Cold pressing preserves beneficial lipids and bioactive compounds that heat-processed extraction destroys.
- Skip added fragrance or essential oils if your skin reacts easily. Fragrance is one of the most common irritants in skincare, and it adds no cleansing benefit.
- "Noncomedogenic" labeling is a helpful starting point, not a guarantee. Comedogenic ratings vary by study and don't account for how an oil behaves in a blend with other ingredients.
| Skin Type | Best Oil Choices | Why |
|---|---|---|
| Oily or acne-prone | Jojoba, squalane | Closely mimics natural sebum, low pore-clogging risk |
| Dry or sensitive | Sunflower, safflower | High linoleic acid, supports barrier repair |
| Normal or combination | Jojoba, sunflower blend | Balanced, versatile for most routines |
| Any type (sparingly) | Castor oil, 10 to 20% of blend | Adds cleansing power but can overdry in higher amounts |
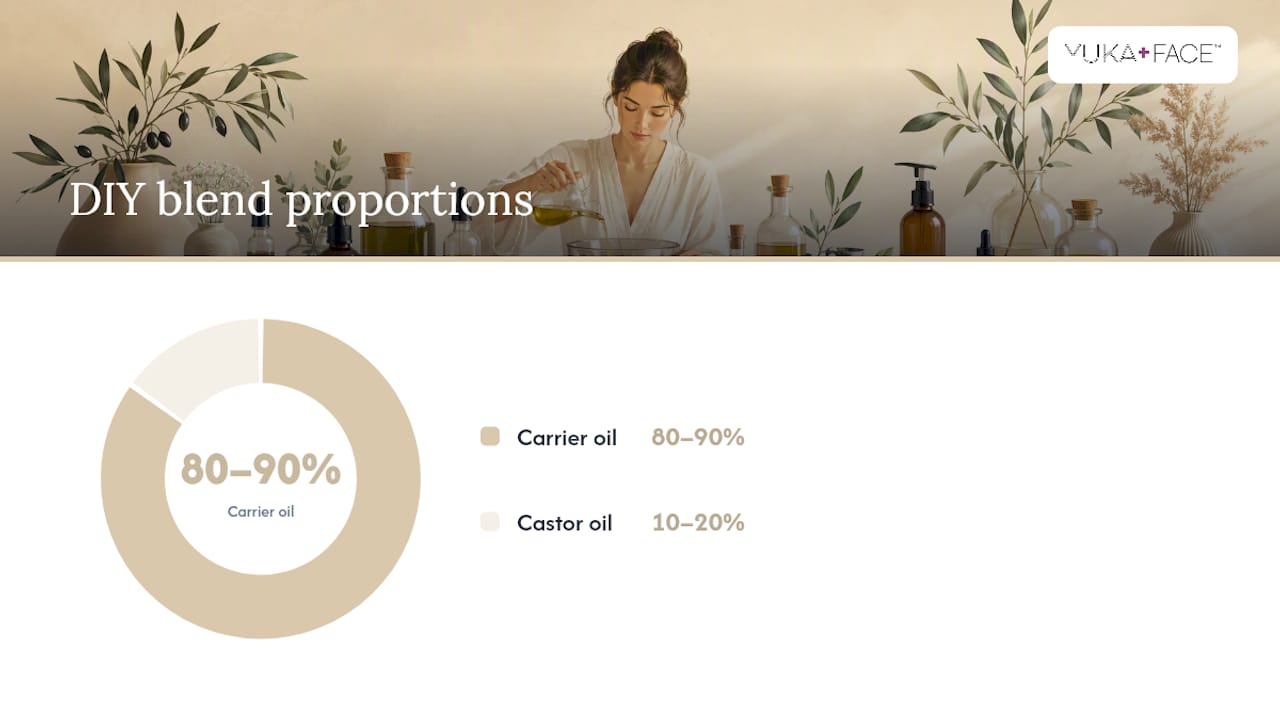
If you're building a DIY blend, a conservative starting ratio is 80 to 90% carrier oil, like sunflower or jojoba, with 10 to 20% castor oil for its cleansing strength. Start on the low end of castor and increase only if your skin feels under-cleansed and shows no signs of dryness. Castor oil is drying at higher concentrations, so more isn't automatically better.
Who Should Try Oil Cleansing (and Who Should Skip It)?
Dry and sensitive skin types, along with anyone wearing sunscreen or makeup daily, tend to see the clearest benefit from OCM. The gentler surfactant load compared to foaming cleansers is the main draw here.
Caution is warranted in a few specific cases:
- Active cystic acne: heavier oils can aggravate deep, inflamed breakouts in some people, even when they wouldn't bother someone with milder acne.
- Seborrheic dermatitis: this condition is driven by yeast overgrowth that feeds on lipids, so adding more oil to the skin can make flaking and irritation worse rather than better.
- Known fungal or yeast-related skin conditions: the same lipid-feeding mechanism applies broadly here.
- Very reactive or eczema-prone skin during a flare: test a small area first rather than committing your whole face.
If you notice deep cystic breakouts, spreading redness, or worsening flaking within the first week, that's a reaction, not an adjustment period. Stop and see a dermatologist rather than pushing through it.
Purging or Reacting? How to Troubleshoot Oil Cleansing
Skin feeling clogged or leaving residue after cleansing almost always traces back to technique, not the oil itself.
- Residue left on skin: emulsify longer with lukewarm water until the oil turns visibly milky, then follow with a warm, steamed cloth instead of a cold rinse.
- Skin feels clogged or greasy: try a brief second cleanse with a gentle water-based wash, especially if you're using heavier oils or wearing thick makeup.
- New breakouts appear: check the timing and pattern. Purging typically shows up as small, superficial bumps in areas you already break out, and it usually settles within 2 to 4 weeks. A true reaction tends to show up as redness, itching, or bumps in new areas, and it doesn't improve with time.
- Still unsure after a month: stop and reassess. If breakouts are getting worse rather than better, that's your answer.
For frequency, nightly use suits anyone removing makeup or sunscreen daily. If your skin runs sensitive or reactive, 2 to 3 times a week is a gentler starting frequency, with a water-based cleanser filling in the other nights.
How Yuka+Face Approaches Oil Cleansing
Formulating a cleansing oil that works across skin types means starting with the same fatty acid logic dermatologists point to.
- Yuka+Face builds every formula on vegan, cruelty-free, and cold-pressed botanical ingredients.
- The Yuka+Face Vitamin C Cleansing Oil is fragrance-free, a meaningful detail for anyone with reactive or sensitive skin who wants to avoid an added irritant.
- Yuka+Face's ingredient philosophy leans on natural, plant-based formulation rather than synthetic fillers.
The Vitamin C Cleansing Oil pairs the oil-dissolves-oil principle with a brightening ingredient, giving readers who'd rather skip DIY measuring and ratio-guessing a formulated option that's already balanced. It's a reasonable next step for anyone who read the linoleic-versus-oleic breakdown above and thought, "I'd rather not mix this myself."
A Few Nights In: What Changed for Me
Switching to a steam-warm cloth instead of a hot splash rinse made the biggest difference in how my skin felt afterward, less tight, more like it had just been moisturized than stripped. My one habit to avoid: don't reach for an exfoliating scrub right after an oil cleanse. The massage step already does a lot of mechanical work, and stacking a scrub on top of it tends to leave skin irritated rather than smoother.
— Kelly
Try a Formulated Cleansing Oil Tonight
If measuring castor oil percentages and testing DIY ratios isn't how you want to spend your evening, a formulated option solves that problem without asking you to guess. The Yuka+Face Vitamin C Cleansing Oil is cold-pressed, vegan, and fragrance-free, built for exactly the barrier-supporting approach dermatologists point to, without the trial-and-error of mixing your own blend.

Use it as step one in the routine above: dispense onto dry skin, massage for 30 to 90 seconds, emulsify with lukewarm water, and follow with a warm cloth. It suits daily makeup and sunscreen wearers especially well, since the vitamin C component adds a brightening step to a routine you're already doing every night. For a deeper look at where cleansing oil fits into a full regimen, the Yuka+Face routine guide walks through sequencing with serums and moisturizers. Ready to try it? Shop the Vitamin C Cleansing Oil and start your first cleanse tonight.
Sources
- How to use an oil cleanser, according to dermatologists | Glamour
- Oil Cleansing Method: Acne, Recipe, Blackheads & Purging | Healthline
- Does oil really clean your skin? — Klarity Health Library
- PMC review: cleansing and barrier function
FAQ
What Is the Correct Way to Oil Cleanse?
Apply oil to completely dry skin, massage in circles for 30 to 90 seconds, then emulsify with lukewarm water until it turns milky before rinsing with a warm cloth.
Do You Oil Cleanse on Wet or Dry Skin?
Apply oil to dry skin first. Water at that stage prevents the oil from spreading evenly and reduces how well it dissolves makeup and sebum.
Do Dermatologists Recommend Oil Cleansing?
Many dermatologists recommend it for removing makeup and sunscreen, especially for dry or sensitive skin, though they note double cleansing is optional rather than mandatory for everyone.
Do You Wash Your Face Before or After Oil Cleanser?
Oil cleansing typically comes first, followed by an optional second cleanse with a gentle water-based wash if you're wearing heavy makeup or have oilier skin.
How Long Does It Take to See Results From Oil Cleansing?
Give it 2 to 4 weeks, since some people experience a short purging period as their skin adjusts before improvements in texture and hydration become noticeable.