
TL;DR:
- Applying facial oils with proper technique and correct skin type matching enhances absorption and skin health. Using 2-4 drops, warming the oil, and massaging gently optimize results, especially when layered after serums and before sunscreen. Avoid common mistakes like overuse, skipping prep steps, or applying over sunscreen to prevent congestion and maximize benefits.
Facial oil is a concentrated, plant-derived lipid that seals moisture into the skin and delivers vitamins, antioxidants, and fatty acids directly to the skin barrier. Knowing how to apply facial oils correctly determines whether you get a lit-from-within glow or a greasy, congested complexion. Oils like rosehip, jojoba, and argan each carry distinct benefits, but technique matters as much as formula. The order you layer them, the amount you use, and how you press them in all affect absorption and results. Get the method right, and facial oils become one of the most effective tools in your skincare routine.
How to apply facial oils: skin type compatibility first
Not every oil works for every skin type. Matching the oil to your skin's specific needs is the first step toward getting real results.
Dry and dehydrated skin responds best to richer, nourishing oils. Argan oil and rosehip oil deliver high concentrations of oleic acid and vitamin A, which repair the skin barrier and restore suppleness. These oils absorb slowly, making them ideal for evening use when the skin is in repair mode.
Oily and acne-prone skin benefits from lightweight, non-comedogenic oils like jojoba and squalane. Jojoba closely mimics the skin's natural sebum, which signals the skin to produce less oil over time. That counterintuitive logic is why many dermatologists recommend oils for oily skin types.
Sensitive skin needs calming oils with minimal processing. Chamomile, sea buckthorn, and calendula-infused oils reduce redness and support barrier function without triggering reactions. For any new oil, patch testing first is the safest approach. Start with one or two drops once a week before increasing frequency.
Here is a quick reference for skin type and oil selection:
- Dry skin: Argan, rosehip, marula
- Oily or acne-prone skin: Jojoba, squalane, hemp seed
- Sensitive skin: Chamomile, sea buckthorn, calendula
- Combination skin: Rosehip, bakuchiol-infused oils
- Mature skin: Rosehip, pomegranate seed, vitamin-rich oils
Yukaface formulates its vitamin-rich facial oils with all skin types in mind, using botanically sourced ingredients that deliver targeted nutrition without synthetic additives.
What tools and prep do you need before applying facial oil?
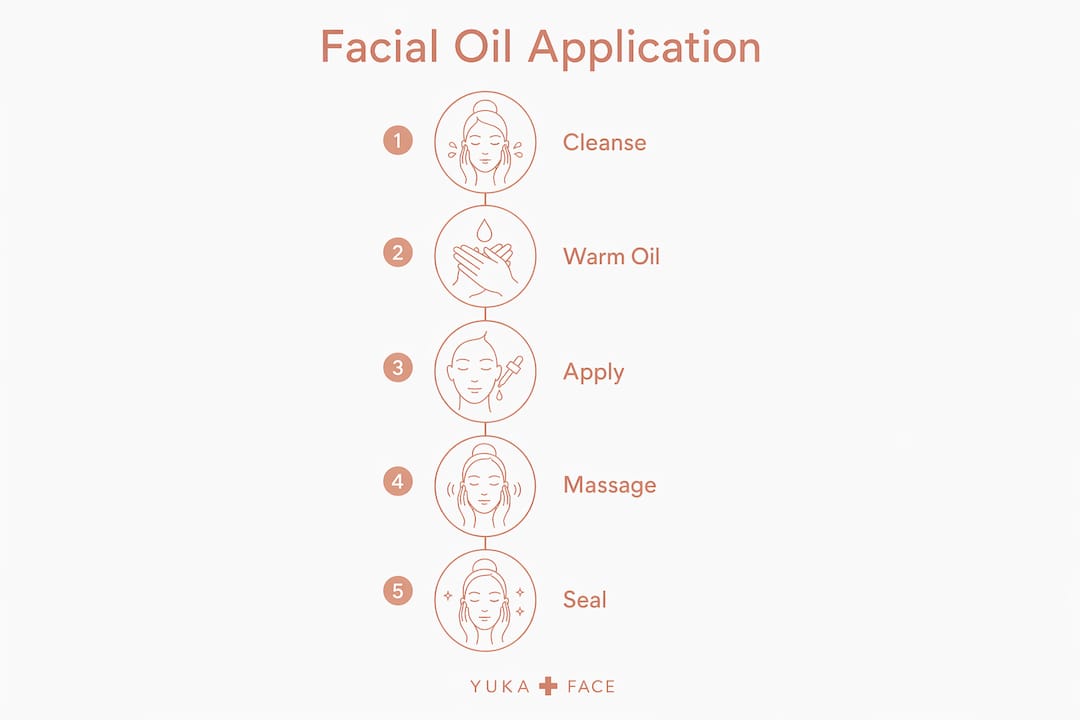
Preparation directly affects how well a facial oil absorbs. Skipping prep steps is one of the most common reasons people feel their oil just sits on top of the skin.

| Prep Step | Why It Matters |
|---|---|
| Cleanse thoroughly | Removes dirt and buildup so oil contacts clean skin |
| Apply toner or essence | Adds a water layer that oil seals in for deeper hydration |
| Slightly damp skin | Open pores and moisture improve oil penetration |
| Warm oil in palms | Mimics skin temperature and improves even distribution |
| Use 2–4 drops only | Prevents greasiness and allows full absorption |
Warming a few drops in your palms before application improves absorption and ensures even distribution across the face. This technique helps oils penetrate the skin better and mimics the behavior of natural sebum. Cold oil applied directly from the bottle tends to sit unevenly and absorb more slowly.
Optional tools like a gua sha stone or jade roller can extend the application into a massage ritual. Both tools encourage lymphatic drainage and improve circulation when used with oil as a slip agent. The Urban Retreat face oil application approach emphasizes using the oil as a massage medium, not just a topical treatment.
Pro Tip: Warm your palms by rubbing them together for five seconds before pressing the oil into your skin. This small step makes a measurable difference in how quickly the oil absorbs.
Step-by-step guide: applying facial oils for maximum results
Follow this sequence every time for consistent, visible results. Skipping steps or reversing the order reduces effectiveness.
- Cleanse your face. Use a gentle cleanser suited to your skin type. Pat dry with a clean towel, leaving skin slightly damp.
- Apply toner or essence. This adds a hydrating water layer. Oil applied over toner locks that moisture in rather than replacing it.
- Apply any serums. Water-based serums go on before oil. Oil creates a seal that prevents serums from penetrating if applied first.
- Apply moisturizer if needed. For dry skin, a light moisturizer before oil adds another hydration layer. For oily skin, you may skip this step.
- Dispense 2–4 drops of oil into your palms. Experts recommend 2–3 drops to lock in hydration and prevent evaporation without overloading the skin.
- Warm the oil. Rub palms together for five seconds.
- Press and pat onto the face. Start at the center of the face and work outward and upward. Use pressing and patting motions rather than rubbing.
- Massage gently. Use fingertips or a gua sha tool in upward, outward strokes. Facial massage with oils enhances lymphatic drainage and blood circulation, boosting skin radiance.
- Allow full absorption. Wait at least two minutes before applying sunscreen or makeup.
- Apply sunscreen in the morning. Sunscreen goes on last. Never apply oil over sunscreen.
Morning vs. evening application
The time of day changes how you use facial oils. Here is a direct comparison:
| Factor | Morning Application | Evening Application |
|---|---|---|
| Primary goal | Seal hydration, prep for SPF | Deep nourishment, overnight repair |
| Oil weight | Lightweight (jojoba, squalane) | Richer (argan, rosehip, marula) |
| Layering position | Before sunscreen, after moisturizer | Final step in routine |
| Amount | 2 drops | 3–4 drops |
| Massage time | 30–60 seconds | 2–3 minutes |
Facial oils applied before sunscreen should be given adequate absorption time. Applying SPF too quickly over oil can reduce sun protection effectiveness. Evening use allows richer oils to work without that constraint, making nighttime the best window for intensive nourishment.
Pro Tip: If you want to use a facial oil as a primer, choose a fast-absorbing oil like squalane and apply it two to three minutes before foundation. It creates a smooth base without interfering with makeup wear.
What mistakes should you avoid when using facial oils?
Most problems with facial oils trace back to a handful of consistent errors. Recognizing them early saves your skin from unnecessary setbacks.
- Using too much oil. Applying too much facial oil causes greasiness and clogged pores. Two to four drops are optimal for most skin types. More is not better with oils.
- Skipping moisturizer. Oils seal hydration but do not provide it. If your skin is dry or dehydrated, apply a moisturizer first. The oil locks in what the moisturizer delivers.
- Applying oil over sunscreen. Oil applied over SPF can reduce its effectiveness. Always apply oil before sunscreen, or reserve oil use for your evening routine.
- Not patch testing new oils. Sensitive and acne-prone skin can react to new ingredients. Test any new oil on the inner forearm for 24 hours before applying it to your face.
- Rushing the absorption step. Applying makeup or sunscreen immediately after oil prevents both from working correctly. Give the oil at least two minutes to absorb.
- Using the wrong oil for your skin type. A heavy oil on oily skin will clog pores. A lightweight oil on very dry skin may not provide enough nourishment. Match the oil to your skin's actual needs.
Facial oils can be incorporated as a primer serum, moisturizing care after toner, or combined with cream for dry areas. Application methods vary based on skin needs and product formulation. Source: Hiro Clinic
Adjusting frequency is also important. If your skin feels congested after daily use, reduce to three or four times per week. Your skin's response is the most reliable guide to the right amount and schedule.
Key takeaways
Applying facial oils correctly, in the right order and with the right technique, determines whether they hydrate and brighten or simply sit on the surface.
| Point | Details |
|---|---|
| Match oil to skin type | Use lightweight oils for oily skin and richer oils for dry or mature skin. |
| Layer in the right order | Apply oil after serums and moisturizer, always before sunscreen. |
| Use 2–4 drops only | More oil causes greasiness and clogged pores, not better results. |
| Warm oil before applying | Rubbing oil in palms improves absorption and even distribution. |
| Massage for better results | Gentle upward strokes and gua sha improve circulation and lymphatic drainage. |
What i've learned from years of working with facial oils
Most people treat facial oils as an afterthought. They add a drop at the end of their routine and wonder why results are inconsistent. The technique is the product.
The single most overlooked step is the massage. Pressing oil into the skin with intention, using upward strokes and light pressure, changes the outcome entirely. Facial massage with oils is often skipped but is critical for maximizing absorption and promoting skin health via improved circulation. I have seen this make a visible difference in skin tone within two weeks of consistent practice.
The other thing most guides get wrong is the idea that oily skin should avoid oils. Jojoba oil, in particular, is one of the best tools for regulating sebum production. The skin reads it as its own oil and dials back overproduction. That is not intuitive, but it is consistent with how the skin barrier actually functions.
My honest recommendation: start with one oil, use it correctly for four weeks, and observe what changes. Experimenting with five oils at once makes it impossible to know what is working. Consistency and observation are more valuable than any single product. Yukaface's approach to natural facial oils aligns with this philosophy. Clean, botanically sourced ingredients let you see what your skin actually responds to, without synthetic variables clouding the picture.
— Kelly
Build your routine with Yukaface
Yukaface products are formulated with 100% natural, vegan ingredients designed to work with your skin's biology, not against it. Every oil in the Yukaface range is cruelty-free, botanically sourced, and created for all skin types and ages.

If you are ready to put these techniques into practice, the Yukaface morning skincare routine is a strong starting point. It maps out exactly how to layer facial oils alongside cleansers, toners, and SPF for a complete, effective daily routine. For deeper reading on hydration and restoration as the foundation of healthy skin, the Yukaface hydration guide covers the science behind barrier support and moisture retention. Clean ingredients. Clear results.
FAQ
How many drops of facial oil should i use per application?
Two to four drops are optimal for most skin types. Using more than four drops causes greasiness and can clog pores without adding extra benefit.
Should i apply facial oil before or after moisturizer?
Apply facial oil after moisturizer. Oil seals in the hydration that moisturizer delivers. Reversing the order prevents moisturizer from reaching the skin effectively.
Can i use facial oil every day?
Most skin types tolerate daily facial oil use. If your skin feels congested or oily, reduce to three or four times per week and adjust based on how your skin responds.
Does facial oil replace moisturizer?
Facial oil does not replace moisturizer. Oils seal hydration but do not provide water-based moisture. Dry and combination skin types benefit most from using both products together.
Can oily or acne-prone skin use facial oils?
Yes. Lightweight, non-comedogenic oils like jojoba and squalane suit oily and acne-prone skin. These oils regulate sebum production without clogging pores when used in the correct amount.